Caps? Coifs? Hoods? Whatever France, 1490s headwear for the ladies! This is the handout for the class I taught in November. I will say that Madamoiselle Hemiole’s version is my current favorite. But with very small updates, this is the same text that was taught then.
Last updated November 10, 2018 – Stellar University of Northshield
Introduction
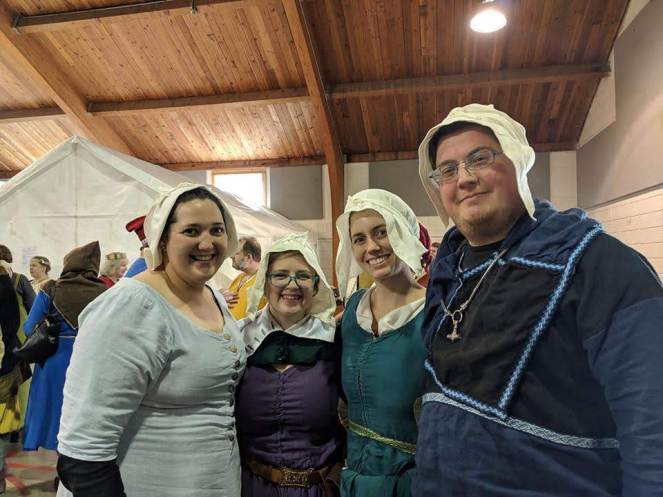
The late 15th century French Coif or hood is a transition garment, moving from the more fitted coifs seen in earlier periods and open hoods to a more structured accessory. They are a cross between these two kinds of garments and can be seen worn alone and worn with some kind of black coif (see above).
Due to the lack of extant examples, the following caveats apply:
- There is no RIGHT way to make this at the moment.
- We can make some reasonable assumptions about construction.
- I have OPINIONS about the right way. You can ignore them if you want.
Materials
Pick one type of fabric for this project.
- Linen (Middle to lightweight works best)
- Tea towel
- Cotton (less period correct, but it does work)
- Wool (lightweight wool)
You will also need:
- Starch (Wheat starch is the period option, I used corn because I already had some)
- Needle, thread, Time
*You do not need interfacing or wire. If they are made of suitable fabric and ironed (preferably with starch) they won’t flop too much and will allow you to flip the edge back for a stylish open hood-esque look.*
Construction (Listed in order from most to least complicated)
Method 1: Madamoiselle Hemiole’s Version (hemiole.com)

Take your tea towel. Add short ties to two of the corners on the same side, 2-4 inches long, depending on head and hair size. Place on head and tie as in Image 2, then tuck in the corners and flip the edge back so you can see. Adjust as necessary. If you want to save time later, pin the folded back edge and sew it down for extra stiffness.
Issues: can look a bit unkempt, depending on if you have dedicated tea towels for headwear and is a bit fiddly when you first put it on.
Overall, it’s a great option, just allow for time to fix yourself up and keep your head tea towels dedicated to being on your head. It’s also fairly fabric efficient, especially if you keep your larger scraps from other projects. It’s certainly plausible from a historical accuracy standpoint in creating the look and the use of fabric.
Method 2: Medieval Tailor’s Apprentice version.
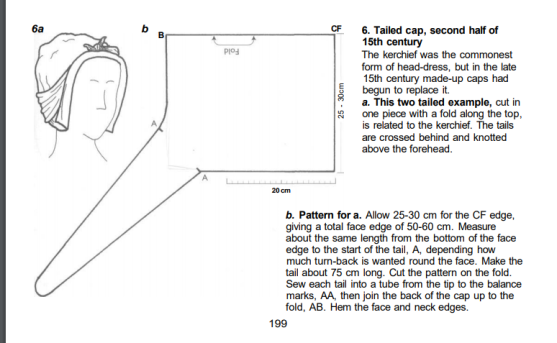
Issues: NOT FABRIC EFFICIENT. This is cut from one piece and leaves massive weirdly shaped bits of fabric everywhere. There is an error in the length of the ties. DO NOT MAKE THEM 75 CM LONG. That means you have a nearly 30 inch tie on both sides of your head for a total of 60 inches. Your head is unlikely to be that large. Measure around your head, divide by 2, add 1-2 inches to each side.
But it is easy, and their actual head measurements make a very nicely sized cap. It is however, the least period method and the error in the text means a lot of people, myself included, make very silly caps.
Method 3: Madamoiselle Sibillia’s Version (that’s me!)
This method is based off of this image, plus general cap construction and it is always a work in progress.

Take the measurements above for the body of the cap (or guess wildly and make it too small). Cut a rectangle of those dimensions, plus ~2 inches. Cut on the fold of the fabric if possible. Cut two inches off the long edge and hem so you get the ties.

Hem as necessary. If you do this with pre-woven tape and use as much selvage edge as possible, that isn’t a whole lot. If you don’t, hem the front and two sides. You can ignore the back for now and hem the ties. Sew from the top of the coif where the fold is, down to about 2 ½ inches from the bottom to start constructing the coif. When you reach the 2 ½ inch point, add the tie. You want to center it and sew it into the seam. Sew down. You’ll have about a 3/4ths of an inch left. Leave that open and hem the raw edges. If you want you can bring the point on the top in with some stitching to make it more rounded
 Issues: Not a perfected pattern yet. It is difficult to get the swoop seen in some of the Robinet Testard illuminations with this item, but I suspect that it has more to do with tie width rather than any major folds in the fabric as with other methods.
This pattern is very fabric efficient as is and is reasonably simple to construct. It also stays on your head like no one’s business, especially if you have a braided crown that helps adhere the coif to the head. It’s also relatively historically plausible.
Method 4: Lucrece (Sevenstarwheel) Method.
This method is moderately complicated, but does make a nice coif and her research is great. I won’t go into too many details here, as it’s quite lengthy, but it’s located at: https://sevenstarwheel.wordpress.com/2012/02/01/late-15th-century-white-hood-or-coif-transition-peroid-war-of-the-roses/ And I’ll demonstrate how it works broadly in class or at any given opportunity, so just ask.
The basic steps look roughly as follows:

Issues: This is fiddly. SUPER FIDDLY. Also, Lucrece recommends adding interfacing in the brim, which is possible but not ideal. I’d personally stay away from the interfacing as it adds a complicating factor when you wash and wear it and isn’t actually needed even if you don’t use starch.
The overall effect is really lovely on this style and the brim does tend to be stiffer than the other options even without the added starch. It is possibly historically accurate, because of its fabric efficiency, but the amount of hemming and sewing is much greater than in the other options. It does make a very nice looking coif and there’s certainly nothing wrong with using it.
Conclusion (aka, the Part where your instructor waxes poetic about the implications of various methods):
My bias for cap construction tends to be towards the following factors:
-Fabric efficiency
-Ease of creation
-Ease of washing
Now this was an item that women would wear every day, which means that they were probably washed relatively frequently and it is possible that they would own more than one. This means that fabric efficiency matters a great deal. It’s also a bit of headwear that seems to be worn on its own without another item over it like a veil or hood, which means it is a means of display, thus making ease of making is a factor. You want to have one nice cap for more important occasions if you can, thus rotating out worn or stained caps as necessary. Having a small project like this is a good way to use scraps of fabric or deal with small amounts of locally woven cloths.
I certainly do not claim to know everything about this topic and will continue to experiment with different types going forward. My leaning towards the “one true pattern” (if such a thing exists) is either method 1 or method 3, due to ease of construction and fabric efficiency, even though the 1490s woman would not have had access to the pre-hemmed tea towels we do today. Even though method 4 looks the most like the images, I hesitate to say it is the best option as it involves a lot of extra work and a similar effect can be achieved by arranging Hemiole’s cap carefully once it’s been ironed and starched.
Whatever method you chose, the addition of appropriate headwear makes an outfit, turning it from a humdrum dress to looking like you stepped out of a painting.

Hi UG! you should really look at my second cutting diagram. It’s posted there but I never did get around to re-writing the instructions. It’s WAY less fiddly than the original and still super fabric efficient. Cheers! Lucrece
LikeLike